MrJazsohanisharma

สร้างหน้า Contact ใน Blogger ไม่พึ่งสคริปต์


ขั้นตอนการทำ

1. คลิกเมนู "หน้าเว็บ"

2. คลิกที่ ปุ่ม "+ หน้าเว็บใหม่"


3. พิมพ์ชื่อหรือหัวข้อของหน้านี้ เช่น ติดต่อเรา หรือ Contact Us

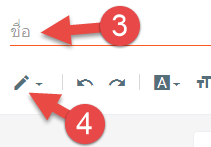
4. คลิกที่รูป ไอคอนดินสอ

5. เลือกรายการ มุมมอง HTML

6. คัดลอกโค้ดด้านล่าง

<style type="text/css">
.contact-form-widget{
margin-left:auto;
margin-right:auto;
width:600px;
max-width:100%;
padding:0
}
.contact-form-button-submit{
margin-top:25px;
width:100%;
height:40px;
font-size:15px;
color:#fff;
text-align:center;
text-shadow:0 1px 2px rgba(0,0,0,0.25);
//background:#EE786F;
border:0;
//border-bottom:2px solid #D4685C;
outline:none;
cursor:pointer;
-webkit-box-shadow:inset 0 -2px #D4685C;
box-shadow:inset 0 -2px #D4685C
}
.contact-form-button-submit:hover{
font-size:22px;
top:1px;outline:none;
-webkit-box-shadow:none;
box-shadow:none
}
.contact-form-cross{
border:medium none !important;
box-shadow:none !important;
padding:0 !important;
height:11px !important;
width:11px !important;
}
</style>
<div id="ContactForm02">
<div class="contact-form-widget">
<div class="form">
<form name="contact-form">
<div class="row row-cols-lg-auto g-3 align-items-center">
<div class="contact-form-error-message" id="ContactForm1_contact-form-error-message"></div>
<div class="contact-form-success-message" id="ContactForm1_contact-form-success-message"></div>
</div>
<div class="row align-items-center mt-4">
<div class="col-12">
<label class="visually-hidden">Username</label>
<div class="input-group">
<div class="input-group-text d-flex justify-content-center" style="width:70px;"><i class="fas fa-user-tag fa-2x"></i></div>
<input class="form-control" id="ContactForm1_contact-form-name" name="ContactForm1_contact-form-name" value="ชื่อ นามสกุล" type="text" onblur='if (this.value == "") {this.value = "ชื่อ นามสกุล";}' onfocus='if (this.value == "ชื่อ นามสกุล") {this.value = "";}' />
</div>
</div>
<div class="col-12 mt-4">
<label class="visually-hidden">email</label>
<div class="input-group">
<div class="input-group-text d-flex justify-content-center" style="width:70px;"><i class="fas fa-envelope fa-2x"></i></div>
<input class="form-control" id="ContactForm1_contact-form-email" name="ContactForm1_contact-form-email" value="อีเมล" type="text" onblur='if (this.value == "") {this.value = "อีเมล";}' onfocus='if (this.value == "อีเมล") {this.value = "";}'/>
</div>
</div>
</div>
<div class="row mt-4">
<div class="col">
<div style="clear: both;"></div>
<label class="visually-hidden">Comment</label>
<div class="input-group">
<div class="input-group-text d-flex justify-content-center" style="width:70px;"><i class="fas fa-comments fa-2x"></i></div>
<textarea class="form-control" id="ContactForm1_contact-form-email-message" name="ContactForm1_contact-form-email-message" value="ข้อความที่ต้องการส่งถึงเรา" rows="5" type="text" onblur='if (this.value == "") {this.value = "ข้อความที่ต้องการส่งถึงเรา";}' onfocus='if (this.value == "ข้อความที่ต้องการส่งถึงเรา") {this.value = "";}'></textarea>
</div>
</div>
</div>
<div class="row mt-4">
<div class="col-12">
<button class="btn btn-warning contact-form-button-submit" id="ContactForm1_contact-form-submit" type="submit"><i class="fas fa-paper-plane"></i> Submit</button>
</div>
</div>
</form>
</div>
</div>
</div>
view raw contact us hosted with ❤ by GitHub
7. นำโค้ดไปวางในหน้าเพจของเรา


8 ทดสอบ ดูตัวอย่าง


9. กดปุ่ม เผยแพร่
10. สร้างเมนู แล้วนำลิงก์ของหน้านี้ไปวาง เป็นอันจบ


ขอจบบทความเพียงเท่านี้ก่อน แล้วพบกันใหม่ในบทความต่อไปครับ
สวัสดีครับ


แสดงความคิดเห็น (0)
ใหม่กว่า เก่ากว่า